BioSync Reader Setup Guide
1.0 Introduction
Setting up a reader as a new installation is a three step process. Each of these steps is covered in its own document:
- BioManager Software Installation
- CNV-1000 Converter Setup (for connection via Ethernet)
- BioSync Reader Setup
- KBF-1FP
- KBF-2PR
- KBF-2SC
- KBF-3KP
- B100-S
- B100-PR
- B100-SC
- B100-KP
Notes:
- The current version of the BioManager software is version 2.0 (at the time of writing). You can download the latest version from the Software Downloads >> Supporting Software section of the Kerisys website.
- You will need to register an account at www.kerisys.com to have access to the software downloads section.
This guide explains the process of wiring the B100-PR reader to the controller, connecting to the B100-PR for the first time, configuring the reader then enrolling user cards and fingerprints.
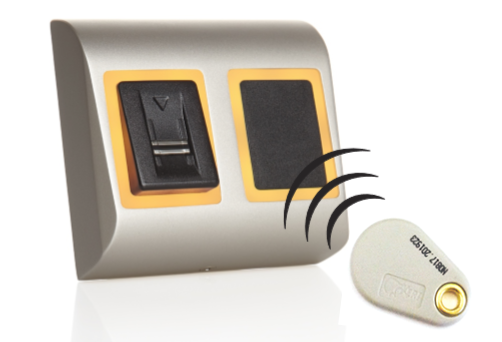
The B100-PR is a dual Wiegand biometric swipe sensor reader, combined with a NXT/EM/HID 125 kHz proximity reader for indoor or outdoor access control applications with storage up to 100 finger templates. Programmable Wiegand Output output (8 to 128 bits).
The reader has a programmable Wiegand output (8 to 128 bits), a multi-color LED bar to indicate access status and a tamper switch output that can trigger an event in the Doors.NET software. If an attempt is made to open the reader casing, the tamper output is activated (the tamper wires; gray and blue should be wired into an available input, such as on an NXT 4x4 module or an unused input on an NXT or MSC controller).
Notes:
- When using the PXL controller, the controller will process up to 31 Wiegand bits.
- When using an NXT RIM the controller will read up to 64 Wiegand bits
- Connection between the biometric readers is RS485 and it is used for fingerprint transfer and configuration.
The B100-PR is a combination fingerprint and proximity card reader. It is configurable via a dip switch (located on the rear of the unit) to read Keri NXT, EM, HID and AWID 125KHz credential types.
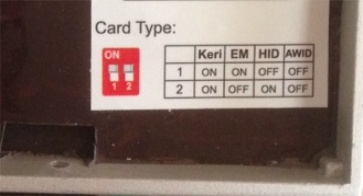
2.0 Set the Correct Card Type
- Ensure the power is OFF at the reader.
- Use a small flat-head screwdriver to set the correct card type on the dip switch.
- Power ON the reader.
3.0 Mounting Instructions
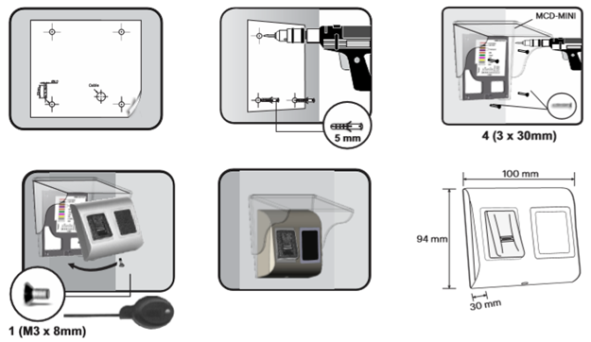
If the biometric reader is installed and used outdoor, the reader MUST be fitted with MCD-MINI cover available as an accessory to protect the sensor from direct rainfall.
The operating temperature of the product is between -15ºC - + 50ºC. If the reader is installed in an environment where the temperature can drop below -10ºC or/and if the sensor could only be exposed to direct sunlight, it is strongly recommended to install the reader inside a third party sealed wall mount box (fitted with additional heater if very low temperature), to keep a constant sensor level performance.
Keri Systems cannot guarantee the functionality of the product if recommended advice is not followed. It is also strongly recommended to use double technology biometric readers when used outdoors to offer first higher security and also the possibility of using different readers depending on users.
4.0 Wiring Instructions
4.1 Wiring to the NXT Reader Interface Module
Reader Interface Module Notes:
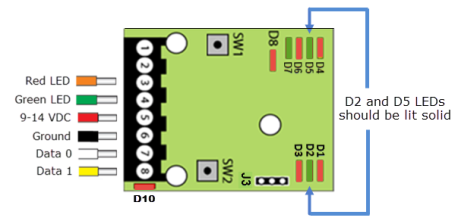
- On the Reader Interface Module (RM3) - the J3 jumper should be set to pins 1 and 2. This will provide 12VDC to the reader and when correctly set, the D10 LED should be solid red.
- If you are using a Wiegand-only module, ensure the reader is using firmware version 03.03.10 - this will correctly set the reader LED mode.
- IMPORTANT: If you have an NXT 4x4 module connected on the same bus as the B100-PR, you MUST use a separate power supply to power the reader.
- The Reader Interface Module can only be used with NXT and NXT-MSC controllers.
4.2 Wiring to the PXL-500W Controller
PXL Notes:
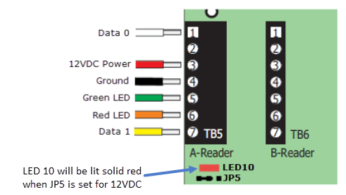
- On the PXL-500W controller, the JP5 jumper should be set to pins 1 and 2 - this will provide 12VDC to the B100 and on the PXL-500W LED10 will be solid red.
BioSync readers ar eONLY supported on the PXL-500W, they are NOT supported on the PXL-500P controller.
- When using the PXL-500W controller with BioSync readers, the controller will process up to 31 Wiegand bits.
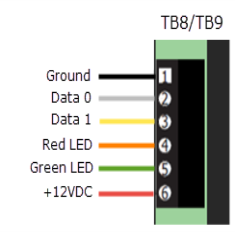
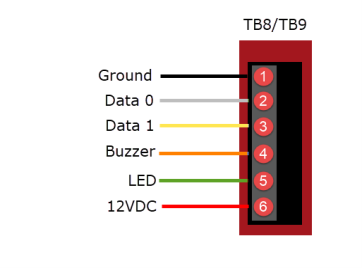
4.3 Wiring to a Mercury EP or LP Controller (i.e EP1502/LP1502)
EP Controller Wiring | LP Controller Wiring |
 |  |
General Wiring Notes
- The shield wire connects with the black (Ground) wire at the controller. At the reader side they are kept separate to prevent a ground loop.
- The B100-PR readers can be connected to virtually any controller that conforms to Wiegand format standards (standard 26-bit or a custom Wiegand format).
- The maximum reader cable run distance for the B100 readers is 500 feet/150m.
- Typically the B100 readers will be powered from the controller, so ensure the controller power supply outputs enough current for the controller and all of the connected devices.
- The maximum current draw of the B100-PR is approximately 150mA.
- When using a separate power supply for the reader, connect the GND for both devices to ensure correct transfer of the Wiegand signal.
- When you have connected the reader to the controller and applied power, the B100 LED bar should flash amber and the reader will beep twice.
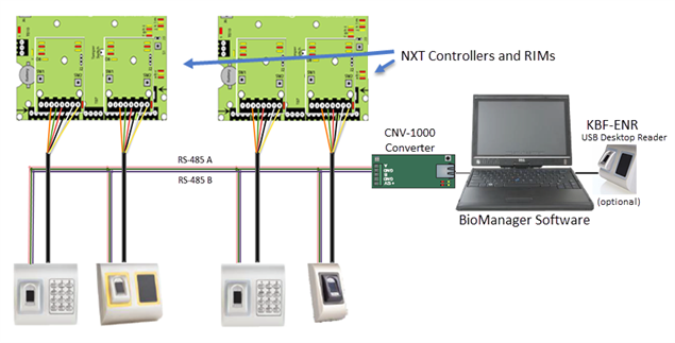
- The BioSync readers are supplied with a 120 ohm resistor. This resistor should be used to terminate the RS-485 network on large networks/long cable runs if the communication is not stable. The network is terminated at the CNV-1000 convertor using a jumper across both pins.
5.0 CNV-1000 Hardware Connection
5.1 Connecting a Single BioSync Reader to a CNV-1000
Important Note: As the CNV-1000 converters have the same default static IP address (192.168.1.100), if you are setting up multiple CNV-1000s, you should connect them to the network one-at-a-time. Configure the first CNV-1000 with its new IP address before you connect a second CNV-1000 module to the network.
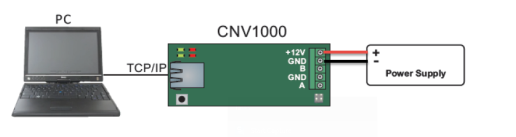
The CNV-1000 converter is connected to the PC via a local area network (into a network hub or switch) or directly from the host PC (using a cross-over cable). It uses an external 12VDC power supply and does not require any drivers to be installed.
This converter is connected to the PC via local area network (into a network hub or switch) or directly from the host PC (using a cross-over cable). It uses an external 12VDC power-supply and does not require any drivers to be installed.
- Apply 12VDC power to the CNV-1000.
- Connect the host PC to the CNV-1000 using a cross-over cable or via a hub/switch using a patch cable.
- Ethernet connection using a cross-over cable from the host PC - Connect the first BioSync to the CNV-1000 using the RS-485 connections.
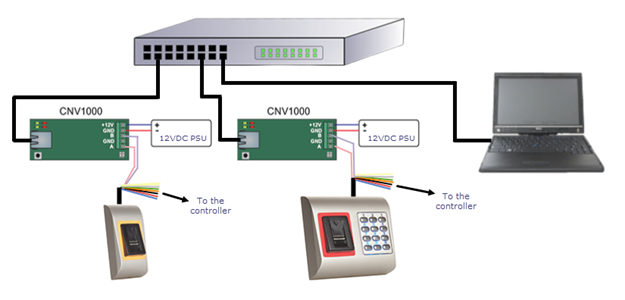
- Ethernet connection into a network switch using multiple CNV converters Wire the BioSync reader into the RIM located on the controller (which should be configured for Wiegand).
Note: For reader wiring information please refer to the Biosync reader setup guide.
5.2 Connecting Multiple BioSync Readers
- Apply 12VDC power to the CNV-1000.
- Connect the host PC to the CNV-1000 using a cross-over cable or via a hub/switch using a patch cable.
- Connect the first BioSync to the CNV-1000 using the RS-485 connections.
- Connect the second BioSync to the first BioSync by daisy-chaining the RS-485 connections.
- Continue the RS-485 daisy-chain connection to other BioSync readers.
- Wire the BioSync readers into the RIMs (which should be configured for Wiegand).
6.0 Add the B100-PR to BioManager
Once you have installed the BioManager Software, setup the CNV-1000 converter, set the reader's DIP switch and added the CNV converter as a portal, you are ready to add the B100-PR reader to the BioManager software.
6.1 Scan for the B100 Reader
When using the CNV-1000 converter you can use the scan facility. Scanning will automatically detect the readerand therefore you do not initially have to know the device ID/serial number - this is therefore the quickest and easiest method of adding the B100 reader.
Note: there is no maximum number of portals that can be added to the software. A system can use any number of CNV-1000 converters.
- Click the BioManager desktop client icon.

- If it is the first time you are using BioManager you will be logged in automatically, otherwise you may be prompted for a user name and password.
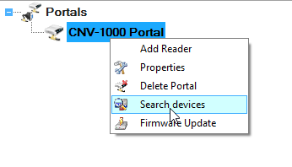
- From within the BioManager software, right-click on the communication portal.
- Select Search devices.
- A 15-second timer will begin to count down.
- The detected BioSync reader(s) will display in the search window.
- Select the reader(s).
- Click the ADD READER button.
6.2 Manual Add
The manual add option is useful if the hardware has not yet been installed but you want to begin setting up the system in advance.
- Open the BioManager software via the client icon on the desktop.

- Right-click on the Portal which should already be listed and select Add Reader.
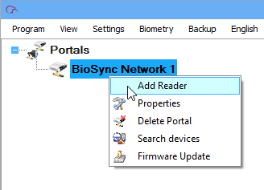
- The Add Reader window will appear.
- Enter a description for the B100-PR reader.
- Select the exact model (B100-PR) from the Type drop-down list.
- Select the Wiegand output type - typically for the B100-PR this would be left at the default setting of Wiegand26.

Note: - Even when using Keri NXT credentials, this setting should still be left at the default of Wiegand26. - On the reverse of the reader you will see a white label which displays a wiring diagram and the device ID/serial number - you should make a note of this number.

- On the reader setup page enter the device ID/serial number.
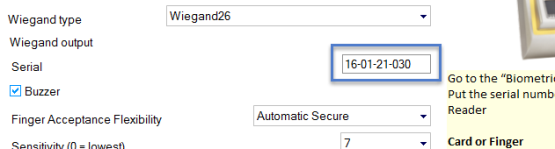
- For now, all other settings should be left at their default values.
- Click the SAVE & EXIT button.
- In the live events grid you should see an online message for the reader.

- You are now ready to start adding users and fingerprints.
7.0 Enrolling NXT Credentials
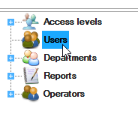
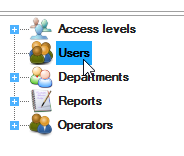
- From the lower-left pane of the BioManager client, double-click Users.
- The Users window will open.
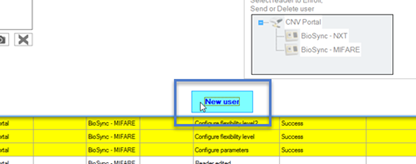
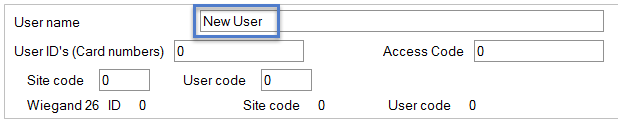
- Click the New User button.
- Enter a new user name.
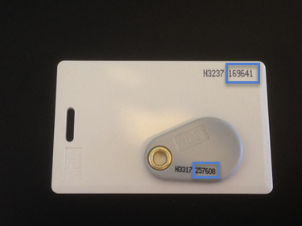
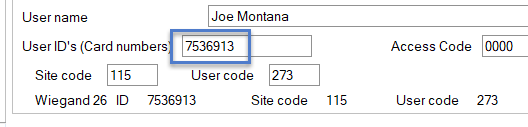
- In the User ID's (Card numbers) field, enter the NXT credential number - this is the number printed on the card/tag - (don't include the 4 digits after the letter N).
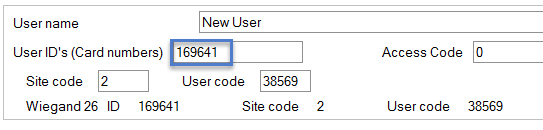
- The Site code and User code are automatically infilled (you do not need to be concerned about these fields).
- You will also notice that the access level is automatically set to Unlimited. The Unlimited group automatically includes any BioSync reader which has been added.
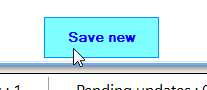
- Click the SAVE NEW button to save the new user.
- The user and credential is now added to the BioManager software and is ready to be added to Doors.NET.
8.0 Enrolling 26-Bit Wiegand Credentials
The following section explains how to add 26-bit Wiegand credentials, for example 125KHz HID ISOProx or ProxCard II credentials.
Note: As well as the Imprint (number printed on the card/tag) you will also need to know the programmed facility code. If you do not know either the facility code or the printed number you will have to use Doors.NET to detect them - Further details near the end of this document.
- Ensure the dip switch on the reverse of the reader is configured for the correct card type.
- Double-click Users.
- Click the NEW USER button.
- Enter the new user name.
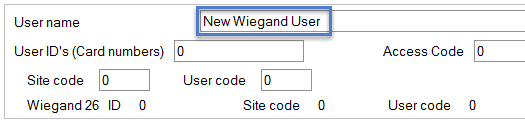
- In the Site code field enter the credential's facility code (also referred to as a site code). (1)
- In the User code field enter the credential Imprint number. (2)
- The User ID will automatically be created (3) - this is the cardholder's unique ID reference and is what appears in Doors.NET live events grid when the card is presented to a reader.

- The BioManager access level will automatically be set to Unlimited.
- Save the new user via the SAVE NEW button.
- The user and the 26-bit Wiegand credential are now added to the BioManager software and is ready to enroll into Doors.NET.
9.0 Enrolling Fingerprints
Now that the credential has been enrolled, you are ready to enroll user fingerprints. The fingerprint is associated with the enrolled User ID number, this means if the reader is in Fingerprint-Only mode the same card number will be transmitted when the fingerprint is verified (the same as with all other reader modes) - There is not a separate enrolled number associated with the fingerprint.
Note: If you have users which will only use fingerprint enrollment you would have to enroll a number that will be transmitted when the fingerprint is verified.
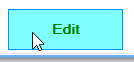
- Open an existing user record (which has a card/tag enrolled).
- Click the Edit button.
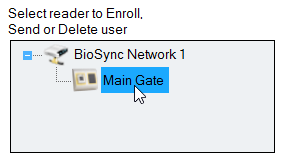
- In the fingerprint enrollment section, click on the B100 reader that will be used for enrollment.
- On the hands image, right-click the small circle corresponding to the fingerprint you will be enrolling (for example; your right-index finger).
- Select Enroll.
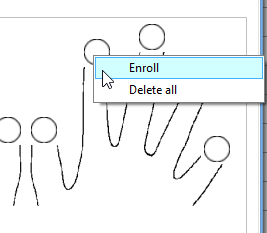
- Swipe the finger a minimum of 5 times at the B100 reader.
- In BioManager the small circle on the diagram will be red and there will be a number which indicates the verification %
of the fingerprint.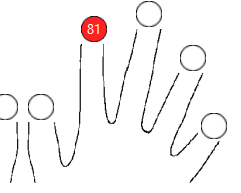
- Ensure the percentage is 75% or greater, then click the SAVE button.
- The fingerprint will now be assigned to the user record and you will be able to use the B100 with all three reader modes.
10.0 Changing the B100-PR Reader Mode
The following steps explain how to change the user authentication operating mode of the reader.
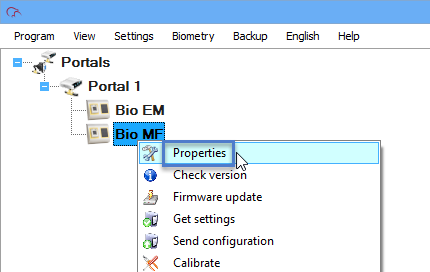
- In the BioManager software in the upper-left pane, right-click on the BioSync reader and select Properties.
- From the BioSync reader properties window, locate Entry Mode.
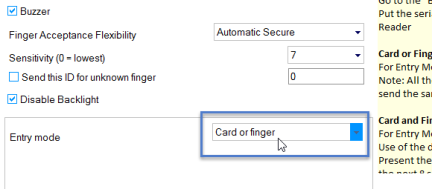
The available entry modes are:
- Finger - You will only need your enrolled fingerprint to gain access
- Card or Finger - You can use either your enrolled card or your enrolled finger to gain access
- Card AND Finger - You will need to use your enrolled card and then present your enrolled finger to gain access.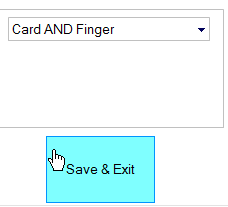
- Make your selection then click the SAVE & EXIT button.
11.0 Enable/Disable the Backlight
The following steps explain how to enable or disable the reader backlight:
- Right-click the B100-PR reader in the BioManager software.
- Select the reader properties.
- Select or deselect the Disable Backlight option.
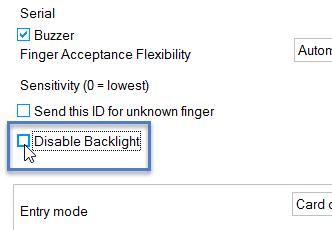
- Click the SAVE & EXIT button.
12.0 Enroll the User in Borealis
As with Doors.NET the same user information now needs to be added to Doors.NET because so far we have only added the users to the reader software and the BioManager software (not to the controller). In this example the B100 reader is wired into an NXT-MSC controller but the same setup procedure applies to all controller types. It details the manual enrollment of a 26-bit Wiegand card but the same steps apply to adding other credential types (such as 32-bit MIFARE or NXT credentials).
The following steps assume you have already created access rights with the BioSync reader(s) added. For instructions about creating access rights in Borealis refer to the following knowledge base document:
12.1 Enroll the Cardholder and Credential
- Go to the Borealis user interface (keri.aetheros.net).
Log into Borealis with your registered user name and password.
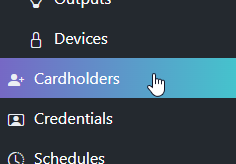
- From the main menu on the left, click on Cardholders.
In the upper-right, click the CREATE button.
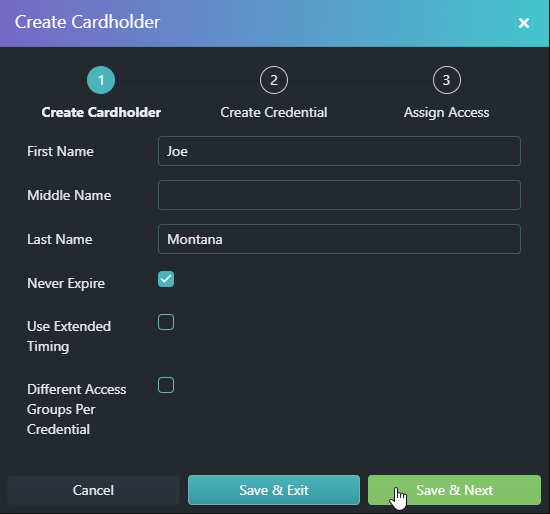
- Enter the cardholder's first name and last name.
Select Never Expire or set an activation date and expiration date if the cardholder will be temporary.
- Click Save & Next.
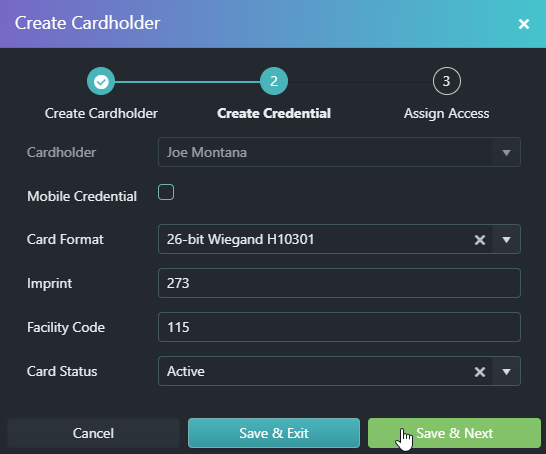
The new cardholder name will be preselected.
- From the card format drop-down list, select '26-Bit Wiegand H10301' (or whichever format of credentials you are using).
Enter the credential's imprint (user code in BioManager).
- Enter the credentials facility code (site code in BioManager).
Set the card status to active.
- Click Save & Next.
Assign an access right to the cardholder or leave it set to None if you haven't yet added the BioSync reader(s) to access groups.
- Click SAVE to complete the cardholder enrollment.
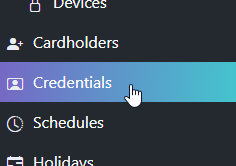
Click on Credentials from the main menu on the left.
- The new credential will be displayed at the top of the list.
The credential record should be displaying the unique cardnumber.
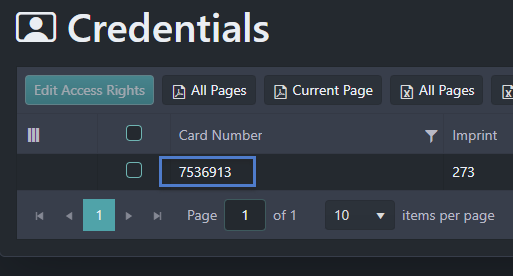
- This number should exactly match the enrolled User ID (cardnumber) in the BioManager software.
12.2 Assign/Edit Access Rights
If you have enrolled the credential without assigning access rights you can assign the access rights from the Credential screen. The recently enrolled credential should appear at the top of the list of credentials.
- Place a check mark in the box located to the left of the card number.
- Click on the EDIT ACCESS RIGHTS button.
- From the access rights drop-down list select an access right to assign to the credential (an access right which has the BioSync reader added to it).
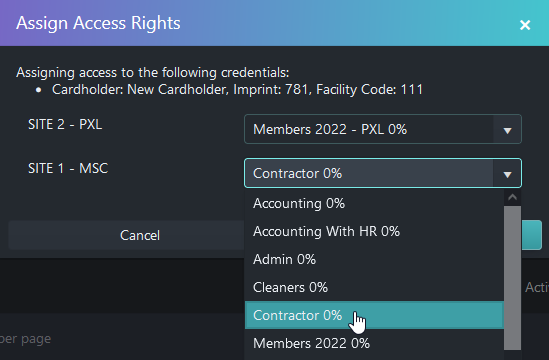
- Click the SAVE button.
- The credential will then automatically be sent to the controllers which have doors that the credential has access to.
Related Articles
NXT-6RK Reader/Keypad Setup Guide
1.0 Introduction The following document explains how to setup an NXT 6RK keypad in Borealis. The document then goes on to explain some basic reader configuration. The NXT-6RK connects to a Standard NXT or NXT-MSC controller via a Reader Interface ...OSDP Reader Setup
1.0 Introduction OSDP readers are supported in Borealis when using NXT-MSC or True Mercury controllers. Notes: Currently Borealis will support one OSDP reader per controller bus. After adding the OSDP reader in the software, if the reader does not ...Add an NXT Exit Reader (Applies to NXT-MSC Only)
1.0 How Do I Add an NXT Exit Reader? When using NXT-MSC controllers you can use NXT Exit readers. An exit reader is wired into the same bus as a standard NXT entry reader (as illustrated), to control entrance and exit through a single door. Although ...Excluding a Reader From Your Subscription
1.0 Introduction A Borealis system incurs a charge any readers that will be used on the system. By default all of the readers on a controller are set to be included in the subscription (even if there is no reader physically connected to the reader ...